Tuesday, November 15, 2011

Gobble Gobble, Kindergarten Style

Today, I visited my daughter's kindergarten class to help with a craft. This is what we created. The turkey body is a little triangle box. I had the kids trace their hands and then cut it out. Next, they colored the hands. We put them on the back of the turkey to appear as feathers. They all did a great job, even if a few fingers got cut off (the paper ones, haha).

I brought a treat to insert inside the box, but on the way to the school I had another idea. I had the kids to write down some things they are thankful for - they had a lot of good ideas, "beautiful earth, God, Mom and Dad, Grandparents..." We put the things they are thankful for in their turkey box.

I challenge you to take a few moments and think about what you are thankful for. Write them down and put them around your scrap area as a reminder of this season.

Monday, November 14, 2011

What a challenge :-)

Well, I knew this blog update was going to be a challenge, but I am proud of what I have learned so far. Chris helped me get my background uploaded. I created one with an owl on it, however, I decided not to use it. I found a picture I had uploaded to photobucket a while back and I decided to use it instead. I have been looking at vector images and feeling a little overwhelmed.

It still needs a little tweaking. I am not sure how to get rid of the pink border on the top. I want to decrease the transparency of the background.

I found a cool site that gives the html color codes. If you need it, click here to see the codes. I was thrilled that I was able to figure this part out in about 5 minutes, since everything else has taken a little longer to figure out.

I will probably be playing with this for a while and I might even pay someone to design a template for me, but for now, I am having fun with this project.

Tomorrow I am going to craft with 10 kindergarteners. I made little bags and the kids are going to decorate them as turkeys. They are going to trace their hand, cut it out and then color it for the feathers, I think it will be so cute!

Wish me luck, I have never done anything like this before.

Shout out to Chris

Thanks to Chris who helped me get my background image uploaded. I am still playing around with the images I am going to use, but at least now I know how to create the background image and edit the html code to get it uploaded to my blog.

Now, if he helps me get my blog updated so it looks correct, I think there may be an Xbox game in it for him.

Do you hear me Chris???

I have to call it a night, it is 1am and I have to get up at 5. This is a fun project that has my mind in full speed, need to wind down somehow. Night guys!

PS, leave Chris a message and tell him he is awesome!

Sunday, November 13, 2011

Blog makeover

I am redoing my blog...not sure how to do it but I am going to give it a try. It will probably take a while. :-) Wish me luck!

Pinwheel Pencil Topper - Take 2


I wanted to make this pencil topper twirl, so I used my Crop A Dile to insert an eyelet on the petals, then I slid my brad through the eyelet. Since this was a trial run, I used scrap paper and ran it through my crimper.

I got the pencil topper idea from the Fiskar's web page.

Saturday, November 12, 2011

Pencil Toppers

I found the idea for these cute little pencil toppers at the Fiskar's web page. These are sooo super duper easy and cute! I think they would make great addition for birthday party treat bags, sports team end of year parties, Valentine's Day...

Here is how I made them.

I punched 8 (6 for the black and white one - it is thick cardstock) - 1 3/4" circles, folded them in half, punched a little hole in one end (for the brad) and then embellish as desired.

I dry embossed the black and white one. For the girlie one, I cut out a flower for the center, then heat embossed it. Add ribbon and Viola, you are done!

Wednesday, November 9, 2011

Magnetic Bead Board


Magnetic Bead Board (Pics and directions)

I found a great website today. I thought I would share one of her projects with you. This is a magnetic bead board. Check out the link above for the directions. I am going to have to try this...looks like a fun project (and I might get the kids involved!)

Tuesday, November 8, 2011

Cricut Mini

Cricut has a mini Cricut launching soon. It says you can use Imagine carts with this cart, interesting. I wonder if we will be able to print with our home printer then cut using the Cricut Craft Room. Heard any rumors (or facts)?

Here is the link to PCs announcement of the mini.

Is it just me or does the new mini look a lot like the Silhouette? Hence the reason I am wondering about being able to print on my home printer then cutting with the Cricut Craft Room.

Cricut Imagine and Cricut Craft Room

What is the story with the Cricut Imagine and Cricut Craft Room? I have not been keeping up.

Monday, November 7, 2011

All Stars


I made this for our office administrator. Her granddaughter is going to a gymnastic competition and she asked me to make a poster for her. There will be 5 pictures added where you see the zebra frames. She asked for black and white but i asked if I could add either red or pink and she said yes...So I chose pink. I hope she likes it!

Sunday, November 6, 2011

No 2 - Champs


We made it to the final game where we lost by 1 point. So proud of these boys and their sportsmanship. The coach said he got lots of compliments on how the team conducted themselves.

This was a lot harder on my son that I thought it would be. When I approached the bench, I saw some tears (from the other boys), I looked at my son and told him good game, and he just dropped his head. After the awards ceremony we all met at a new local yogurt shop and celebrated a great season (again). By the time we got home, my son was upset. He said this was his favorite coach (he meant coaches) and he is going to miss his teammates. After lots of hugs and words of encouragement, looking at the Scorpion website and the video daddy made, things were better.

My son attends a private school and 2 of the other guys on the team attend the same school, they are going to wear their jerseys tomorrow and the coach asked the principal to recognize them when they do the morning prayers and announcements.

Last week, my son pre-coordinated with his teacher to bring in his trophy and she said yes...so it should be a good day tomorrow.

Go Scorpions!

Saturday, November 5, 2011

Tournament Status

My son's team played 2 games and they won BOTH! They play again tomorrow. They played the #3 team second and it was a tough one. It was tied 1-1 until the last 15 seconds, when
Zach pushed down the field, then passed to Noah, and SLAM into the net, 2-1. Tomorrow is going to be tough. The boys are tired.

No 4 is mine :-)

We went to Outback afterwards and noticed there were not a lot of people there, and immediately the hostess said "Game", everyone was at home getting ready to watch the AL/LSU game...it is all EVERYONE is talking about...let's see who wins this one...

See you guys later!

Friday, November 4, 2011

Soccer Treat Bags

Go Scorpions! Tournament starts tomorrow...we play 2 games and if we win, we have to play on Sunday. I made these bags for the kids - I will hand them out at the last game, whenever that might be. I used vinyl to add the child's name and jersey number.

The bag is a silhouette file I purchased from the SIL library. I cut clear acrylic to cover the circle, then I printed and cut a soccer ball, ran it through my Xyron and viola, a soccer treat bag. Inside are small bags of pretzels and fruit snacks.

These can hang on a door handle, how cool is that?

IF you are counting...we didn't have a number 1 or 2 for some reason???

Wish us luck, Go Scorpions!

Thursday, November 3, 2011

Treat bags for Fall Festival


I made 2 male and 2 female treat bags for the kids fall festival. As room mom, I am in charge of coordinating volunteers and donations for the school fall festival.

The shark one is my favorite. I love the embossing. I feel like the other ones are a little too plain even though I printed the pattern paper and then cut out the box. I used acrylic behind the frame window.

I hope these are acceptable, I have not seen anyone do anything like this for fall festival...maybe I will start a trend?

Prayer Request

I have a special prayer request tonight. My husband has family in Thailand in the heart of the flood. I ask that you please pray they get the food and medical supplies they need. I won't go in to all the details but they are in a serious situation. Please pray the waters recede soon. Thank you!

Tuesday, November 1, 2011

For me, really?

(Click image to enlarge)

How awesome is this card and composition book? It was sent to me by my great blogger friend Tanya. You don't know how excited I was when I saw it was a RAK from her! I love everything about these, the colors are awesome, the 3D flower is beautiful, the ribbon (Tim Holtz) - too cool, the hint of Paris on the paper, ewwww lala! Oh and don't forget bling, I love bling!

I know a lot of you aren't football fans, but if you live in AL, you have to choose a side, either Alabama or Auburn and thankfully, she chose the right side, hahahahaha...War Eagle Tanya! Thank you for always taking the time to check in on my blog and offer words of encouragement. I appreciate every comment!

If you have not checked out her blog, please do so, you will be so happy - and don't forget to follow Tanya here.

Hugs Tanya, this is just perfect, you made my day!

Saturday, October 29, 2011

We are the Champions!

Go Scorpions!

Soccer bag design


My son helped win the regional soccer tournament, now they are off to the area tournament. How exciting!!! I plan to make soccer ball bags filled with candy to hand out at the next tournament.

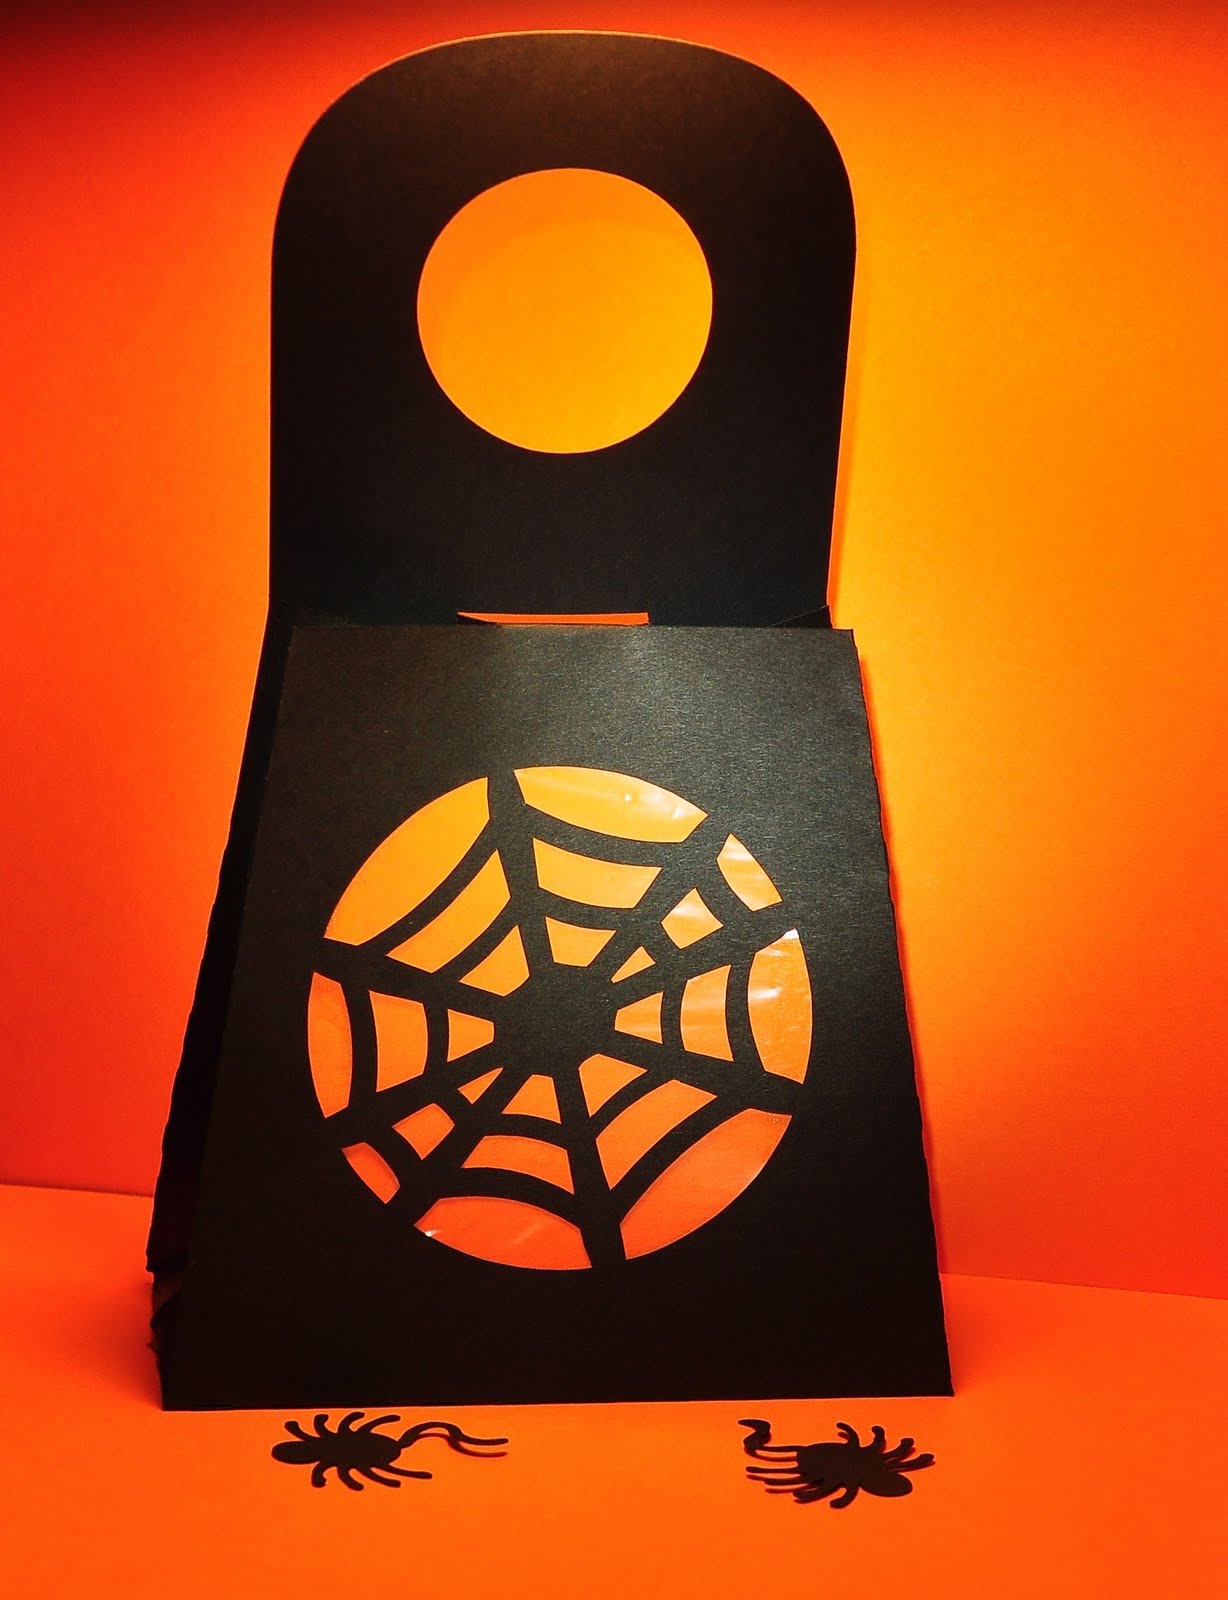
Silhouette software makes this so easy, I am using the spider web bag I made yesterday. All I have to do is delete the web and inset the soccer ball. How easy is that?

Friday, October 28, 2011

Microbeads?


I have tried several methods of adhering these beads to paper, but none seem to really work. Anyone use these and have a good method of applying them to paper?

Thanks!

Spider Web Treat Bag


This spider web treat bag can also be hung on a door handle. I didn't use the handle with the slit for the door, but one could easily cut a slit and hang it on a door. My son is going to love this! I used a Ziploc bag behind the web and then I inserted orange card stock for more definition. Fun, EASY project!

Owl Treat Bag


How cute is this little owl treat bag? I meant to emboss her whole body, but I forgot to do that before I put her together. This is a Silhouette file I bought from SIL. Now I need some candy so I can stuff her :-) I added a ribbon handle for easy carrying.

Wish

Front

Back

I made 2 of these, one for each kid. As you can see, my daughter has already colored on the first page of her book. These books were made with plain cardstock, Embossing ink and powder, SU! stamp, Cuttlebug with Swiss Dots dry embossing folder and PC Your Story (binder). I bought the Your Story strips from Hobby Lobby and wanted to try them out, so this was my first project.

I embossed the inside too! I love embossing, why don't I do it more?

This book is a Christmas Wish List book. I am trying to get a head start on Christmas Shopping. No last minute surprises this year (hopefully)!

Hello Card

I love this little bird embossing folder. I have stamps I never use so today I thought I would pull out a stamp and use it. Not my favorite card, but it has elements I like. I like the scallop edges (it is a Fiskar punch). The jewels Tanya gave me a while back add a nice touch to any card.

Saturday, October 22, 2011

Rhinestone Pattern - a little different idea

2 Snowmen images filled with patterns
2 Snowmen images with cut lines showing
I had a thought today, what if I wanted to use a Silhouette rhinestone pattern for a different purpose? Here are the instructions to my idea.
1. Find rhinestone pattern/design in Silhouette Studio
2. Fill image with a pattern
3. Select all, then choose "no cut" for the lines
4. Offset by .250
5. Select all, then Ungroup
6. Select outline
7. Select to cut the outline
Now, put it on a card or layout. How cut is this snowman?

Friday, October 14, 2011

Especially for you card


Supplies:

Adhesive

White cardstock

Cricut Imagine

Cricut Fabulous Finds Cart

Cricut Imagine Audrey Cart

Silhouette

Office Printer
Ink

Ink dauber


I created this card for my bosses boss, Walt. He is actually the manager who hired me 10+ years ago. I worked for him for probably 4 years or so until I moved to the software group. He has moved up and I have moved to the Avionics Engineering group, which is happens to fall under Walt. We are having a picnic for our boss and decided to invite Walt also, so I made this card today.


I printed the paper on the Cricut Imagine. The pattern is on the Audrey (which also happens to be a lovely name and a lovely blogger!) cart. The file folder card can be found on Fabulous Finds cart (I used the blackout feature). After cutting the card x 2, I switched over to my Sihouette.


I found the frame in my library. I created an inset, then made the line dotted and white. I repeated the process only making the offset larger than the original frame and again added the dotted white lines. This is sooo easy to do with the SIL and I think a great touch.


Lastly, I added some twine and inked the edges...hope he likes it. I am sure he will appreciate it...he's that kind of man.


Simple, but pretty I think.

Review of the Paper Studio embossing folders

I had a little free time today so I stopped by Hobby Lobby. I was very selective in my purchases, but I did purchase an embossing folder made by the Paper Studio. I have to say, it is awesome. I wasn't sure how it would work in my Cuttlebug, but it worked perfectly. The emboss is deep, gives lots of texture. Highly recommend these!

Tee Shirt Pom Poms

I found a neat blog today. She had the cutest pompoms with a tutorial - I had to try them. Please check out her website, it is soooo cool!

I followed her instructions on the first 2 and then I tried to modify it on the 3rd one.

Here is the first one. It is made out of decorative trim ribbon. I added it to my daughter's dance bag.
The next one I made out of an old t-shirt like she did, but my edges didn't curl...must be the type of material???


The third one is also made out of the t-shirt but I wanted to see if I could modify the steps.


The first step is to cut the strips.


The second step is to fold the strips in half and tie them together.


The third step is to cut the end that is flapped over. Last, work with it so you can't the ribbon that is holding it together.


Fun project, I would love to do this with different patterns of cloth.

Tuesday, October 11, 2011

Card Set


Envelope (hand cut)


Card and embossed liner on envelope


Embossed Seal on envelope flap


I made these cards for S.O.S. She is not a girly girl and has asked me to make cards for her before and she wanted them very plain, so that is what I did with this set. My favorite is the black and white. I love all the embossing. The "D" is cut from vinyl and looks wonderful on the card. I put a mounting square on the back of the seal so she can remove the sticker backing and seal the envelope.


Wish I could have made more but I think I am done with this project. I am a slow scrapper. It took me 3 nights to finish these cards. I would like to make 1 more card to match the black and white card, but not sure I have the time.

Saturday, October 8, 2011

Happy Birthday Card


I made this little card for my sister in law. I wanted to learn how to make the rosette flowers but couldn't figure it out, thank goodness for youtube and a couple of girlfriends to help me out. It really works best to use E6000 on the back and in the middle of the rosette, then place something on top for a few minutes so it can set.


I went outside of the box a little on this. Normally I wouldn't have added the pink embellishments you see but tonight I thought, why not? I actually kind of like it.


Have a great weekend!


Rhinestone Paw


I used my Silhouette to create a rhinestone paw. The paw was purchased from the Silhouette store. It is orange and blue for Auburn, go Tigers! I purchased the white sweater at Target (it was on clearance for 13.00, wahhhooo). Now I want to put this on a bag. Hopefully I will be able to find one soon.

Thursday, October 6, 2011

Tim Holtz Creepy Dolls


Am I the only one that finds these broken dolls creepy?

National Boss Day

(click image to enlarge)


National Boss Day (NBD) is coming up on the 17th. I created this card for my awesome boss. He is a family man, who raised his daughter by himself. He always understands when I need to take a day off or even a few hours to go to the school for a program. Our group really appreciates him so every year we give him a card, a small gift and either take him out to lunch or have a picnic across the street from our building. We have a coworker who loves to grill, so he grills chicken or steak and we bring all the extras. Yesterday, my boss said it was time for another picnic, so I am going to see if our coworker will cook for us on NBD.


I made this card using my Silhouette (SIL). The pattern paper is a pattern I purchased from SIL. I used it twice on this card, once on white paper and then again on ivory paper. The typewriter is a print and cut file I bought from SIL. I typed the text on the front of the card using the SIL software. It says, "National Boss Day 2011 Enjoy". Twine was added to the top to add some color and texture. On the inside of the card, I used a 1 3/4" circle punch then stamped "It's your day". I inked all the edges. On the back, I added the ribbon my husband bought for me to add to my cards {he ALWAYS checks to see if I used it ;-)}


Thanks for visiting my blog.


Friday, September 30, 2011

Problems leaving comments

Hey guys...just wanted to let you know, I am unable to leave comments on your blogs. I don't know what is going on...so please don't think I am ignoring you, I just can't get my comments published. I am going to sign out and sign back in to see if that helps.

Have a great weekend!

Monday, September 26, 2011

Orbiter


My daughter's kindergarten class is studying space this week. I made these orbiters and I am going to send them in tomorrow. Her teacher is having a shuttle dog lunch on Friday and I thought she could use these as the nameplates for the kids.


I had a hard time making these as the layers were hard to glue on. I had decided to just leave it and not do anything but then I remembered, wait this is the SIL so I colored all my layers then put them in place and grouped them. Next, I printed them using the registration marks so my SIL will know where to cut them and VOILA, here they are! I freehanded the rutter in the SIL software and even put the slit in the oribter so I could insert the rutter and fold it over.


I worked on this for a while today and I am happy with the results...even if it is missing some details.


Oh- I forgot to add, I cut strips of black paper about 1" x 8 1/2" folded it in half and then taped to the back of the orbiter...that is how they are standing.


There are only 10 kids in my daughter's class, how cool is that? She has an awesome teacher and we are loving the class! I hope her teacher likes the orbiters.

Sunday, September 25, 2011

Happy Birthday Jackson!


I made this Birthday card for an awesome little 6 year old, Jackson.


I bought the card/envelope file from Silhouette.


First, I printed each image with the pattern you see here (purchased from Silhouette) and then I cut them out with my SIL. Next, I flipped the images in the Silhouette software and printed/cut them again. I used my Xyron to make these papers sticky so I could make everything doublesided. I had an oppps when printing so I used that print and my 1 3/4" punch to cut a circle then I add a stamped "J" and put that on the front of the envelope. Bakers twine to accent and I was done!