Saturday, January 16, 2010

Forever Young Purse


Here is my first purse from Forever Young Cart. I cut it at "Fit to Page" on double-sided paper. Here is a pic before I altered it. I did add a brad on the closure.


In the following picture you can see I used some Glimmer Mist - I don't like it at all. This the first project I have used the Glimmer Mist on b/c it usually clots when I spray it. I found if I clean the sprayer and hold it at an angle, it doesn't clot as bad, but I am not feeling the effect it gives. At least I tried it and now I know I don't like it.


Here is the back. I inked it with Tim Holtz Distress Ink (Vintage Photo). Like this so much better than the Glimmer Mist.


Happy Birthday Flower Tag

Tag (Front View)
Tag (Back View)


I made this card for a gift we gave to a little girl who was turning 7. I gave her an American Girl card making pad, some American Girl Embelleshments and an American Girl punch...all bought from Michaels.


The flower is cut from George. The light pink paper on top was bought pre-embossed. I used a punch to punch out the circle on the back of the tag and a stamp to stamp the flower with the lines in the middle.


I bought some Prima flowers - Daisy Doodles and no longer like them, however for this project, it really needed some texture so these are the yellow flowers I added to the tag. A pink fabric colored brad was placed in the middle of the flower to hold the primas on to the flower.


This tag took like 10 minutes to create. Very simple and fast! I inked the edges but you can't see it in the pics.

Sunday, January 10, 2010

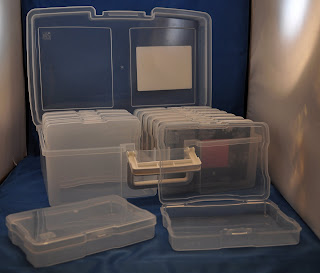
Photo Storage Box


I bought this at Michaels to help me organize my photos for easier scrapping. The box holds 1200 4x6 photos. It is made in the USA - wahhhooo! Says it is Acid Free. It is made by IRIS. Sorry I don't remember how much it cost but it was either on sale or I had a % off coupon.


Friday, January 8, 2010

Sunday, January 3, 2010

Gingerbread Cookies - 2009


Where do I being on this LO...it took me 2 days to create. Lots of Stickles and Cricut.


Carts:
Winter Woodland
George
PaperDolls Dress Up
From My Kitchen


The Gingerbread house is a church from WW...I cut off the top to make it more gingerbreadish. I used the rounded rectangle from George cart to create the gumdrops. Once I cut them on the Cricut, I then used my straight edge to cut them in half and I used "Diamond Stickles" to add some bling. The white icing is Liquid Applique...let it dry over night and used my heat embosser to make it puffy....love this technique!!!!


I used the polka dots embossing folder. for the gingerbread background. The background was cut from WW and the gingerbread was cut from PaperDolls Dress Up.


The bowl and spoon handle were cut using "From My Kitchen".


The background paper is from a stack...and the dots are embossed.


I used a Fiskars punch for the border (top and bottom).


If you have any specific questions, please feel free to send me a message...I'll do my best to answer.

Monday, December 28, 2009

Paisley Flocked Turtle (Updated)

I updated the flocked turtle I made previously...I added some stickles on his toes, tail and mouth. I used my Copic markers to edge the turtle. The background paper was embossed with my CB and Quickutz Polka Dots embossing folder. Then I used my copic markers to color in the embossed circles.

Additional supplies needed:

Cuttlebug
Quickutz Polka Dots embossing folder
Stickles
Copic Marker

Sunday, December 27, 2009

Saturday, December 26, 2009

Paisley Flocked Turtle


Supplies:

Cricut
Cricut Paisley Cart
Cardstock
Stampendous summer lovin' flock
Stampendous saltwater taffy flock
Xyron
Craft Knife
Bristle Brush (i.e. paint brush)
Copic Markers

I cut the turtle from the Paisley cart at 3". Then I ran each piece in my Xyron...next, I carefully applied the flock - using my craft knife to help with the boundaries.

I used my Copic markers to draw in the eyes after the turtle was flocked.

This is my first flock - I love the texture it gives...but it is very dusty...I had to dust my scrap area when I was finished with this project.

I found the flock at Michaels...it was a nice surprise!!!!!!

Thursday, December 24, 2009

Merry Christmas Snow Friend


Carts:
SnowFriends
WIMG
Wildcard


Tools/Supplies:
Cuttlebug
Cuttlebug Swiss Dots Embossing Folder
Heat Embossing Gun
Ranger Embossing Powder (Polysparkle)
Ranger Big and Bossy clear embossing ink pad
Embelleshiments
Xyron adhesive
Copic Markers


I cut the snow guy out at 3". Next, I used a dobber to ink my Snow Guy with the clear ink...then I sprinkled on the embossing powder - removed the excess and then heat embossed it. I used the Swiss Dots folder to dry emboss his hat. I used some - what appears to me as terry cloth ribbon for the white on his hat. I also used the Swiss Dots to emboss the scarf and gloves. I used copic markers to make his white shoes black, but really they should have been cut out of black cardstock.

The sign was cut at 3" also...I inked the edges and then cut out "Merry" from the Wildcard cart.

Can I say, cutting fonts is my least favorite thing to do!!!!!!!!


Since my guy was so small, I chose to create his face with my Copic Markers. It's just easier. The small mouth and eyes are impossible for me to cut and adhere - even with the QuickKutz - The Quicker-Poker-Picker-Upper!

We are still trying to figure out the light box - as you can tell the 2 pics are different colors....we think we need better lighting. The first pic was taken with just my husbands brand new flashlight and the second was taken with the flashlight along with the overhead kitchen light and the lights that came with my new portable photo box.


Tuesday, December 22, 2009

Gingerbread House


We bought a Gingerbread house kit this year. It was 9.99 at Sam's. Everyone had a lot of fun working on this house. What a memorable activity for the kids!

Monday, December 21, 2009

Snow Boy


I got a portable photo studio for Christmas. Here is a pic I just took with it. I'm lovin' it!


Monday, December 14, 2009

Elf


I made this elf using Cricut Paper Doll Cart. He is 5". I hand cut the collar and embossed it with CB Swiss Dots folder. The background paper is embossed with a star CB folder. After embossing the paper, I inked it with white - to resemble snowflakes. I finished off the elf with some garland fiber.


This guy is supposed to resemble "Elf on a Shelf" - therefore I did not cut out his boots or shorts.

Sunday, December 13, 2009

Another Snow Friend card


Another snow friend card...I LOVE these guys! I haven't put my message on this card, but I had another friend who had surgery last week...so I went with the same theme. She is recovering a lot faster than my other friend...so I may have to come up with a different message. I love the fibers on the top of his hat! TOO CUTE!
Let me know if you like it!

Saturday, December 12, 2009

Hope you are on your feet soon!

Card is 4 x 5 1/2 - I cut the snow friend at 3". I used stickles for the boots and fibers on the hat and bottom of the shirt.

Sunday, November 29, 2009

Very Simple Winter Woodland Mini Card


Here is my first mini WW card. I like these little embellisments so I will probably be using them a lot on my winter cards.
The background striped paper is from the Martha Stewart school days multimedia pad. It is striped blue and white on one side and blue on the other side. The card is approximately 7 1/4" x 4 1/8" (unfolded). The embellisments are cut at 2". I used some ribbon to tie around the card for texture...and added stickles in Aqua, Cotton Candy and Star Dust.
I used my SU! spots to ink the edges for added dimension.

Here is the list of supplies needed for this project:

Winter Woodland Cricut Cart

Stickles


  • Auqua

  • Cotton Candy

  • Star Dust

Double Sided Patterened paper

Ribbon

Adhesive

Ink


  • Pixie Pink

  • Tempting Turquoise

Saturday, November 28, 2009

Church


I decided to make a church for my son's room. I hand cut the vellum for the windows. The church is cut at 4" - and can be found on the Winter Woodland cart.

I embossed the bottom of the church to make it look like it was rock on the bottom. I colored the textured with my SU! watercolor pencils.
I put a rechargeable tealight inside. Looks like I need to cut a hole in the roof so the light shines through to the steeple.

Friday, November 27, 2009

Paisley Owl Card

I made this 4 x 4 card using my NEW Cricut Paisley cart.

The card is embossed using a CB snowflake folder. I inked it with my SU! stampin' spot - temping turquoise. I cut the "cartoche" from the Sweethearts cart...at 4". Next, I embossed it with CB Swiss Dots folder. The owl is cut from Paisley at 2".

I used brads for eyes, ribbon around the cartoche and stickles for some bling.

Orignially, I wanted to make this mainly white...white card with the blue cartoche and a while owl but that didn't look right...so this is what I ended up making.

Thursday, November 26, 2009

Snow Friend Charm


I made this charm using George and Snow Friends.

I cut the charm from George at 10" - blackout feature.

The green circle was cut at 7 1/2". (George)

Patterned paper was cut at 6 1/2. (George)

The Snow Friend was cut at 6".

I used my SU! white craft ink pad to ink the snowman, then I embossed him with Snow glitter.

Sunday, November 22, 2009

Snow Friends Family Frame

Wow, how much fun are these Snow Friends?

I made this family tonight...not planning to frame it, but once I had the thought - I had to see what it would look like. I am sooo happy with how this turned out.

I cut the Dad at 10", Mom at 8", boy at 6" and girl at 4". I used brads, CB embossing, inking...the paper is all Bazzill - it has a shimmer to it...bought it from Ms today...2/1.00.

Snow Friends!


I made these for my kids - used the Cricut Snow Friends Limited Edition cart.

The boy snow friend was cut at 6". It's hard to see the inking around the edges...but in person it adds some dimension.
The girl snow friend was cut at 3 3/4". I embossed her hat and inked the edges. In place of the paper buttons - I orignally emobossed them and used those, but then decided a snap would be cuter...so I brought out my Crop a dile and added the snaps for buttons. I also used Accent Essentials to cut the square scallop at 5 3/4".

The patterened paper is part of the "makingmemories tinsel" pack. I found it at Target.

Friday, November 20, 2009

My first Snow Friend


I finally received my Snow Friend cart! WAHHOOO!!!!

Here is a card my friend Audra and I made together. She picked out all the colors and assembled him. I think he is adorable!!!! The background patterened paper cam from "makingmemories" tinsel 8x8 specialty paper pack.

We cut Snow Friend #9 at 4 1/4" and placed him on a 4 x 5 1/2 card.

Thursday, November 12, 2009

Box/Bag


No Cricut bag.
My husband helped me create the template for this box /bag. It is 10 x 10 before folding. I lost inspiration for this project but still wanted to complete it, so there is not a lot of detail...no inking for one thing.

I embossed the bag using the Fiskar plates...that's hard work compared to the CB - haha...next I free handed the white around the top of the bag - then embossed each with the CB.

I cut the handle with my straight edge, it is 1" - I taped a piece of ribbon on this strip of white paper and then taped it to the inside of the bag.

The bow on the front was a suggestion from my husband.

Saturday, November 7, 2009

School Themed Calendar


I am making this 8 x 8 calendar for my son's teacher. It is very simple. No Cricut yet...so far I have completed Jan, Feb and some of March. I think March will be complete with 1 embellishment.

The "To Do" on January came from Ms. It is from a "Sticky Journal Stax - School". The graph paper on Feb is also from this stax. The star on Feb. is hand cut - I used a CB embossing folder to emboss a red piece of paper, then I cut out the star from the embossed image. Last, I inked the star with white SU! ink. I used silver brads to make the paper look like it is pinned in the cork paper. "School Days" on March is cut from chalkboard paper I found at Hobby Lobby.
I would love to have an apple embossing folder...guess I will have to make one with my Cricut and a cereal box.

Saturday, October 31, 2009

"S"


I bought this "S" at HL...taped some giraffe paper on it and used a craft knife to cut around the edges...last, I tied a zebra print ribbon around the "S". I bought the over the door hanger from Wal-Mart - in the Christmas dept.

Cricut Shirt


I made the decorations for this shirt using my friend Whitney's detailed instructions. I was surprised at how easy this was...thanks to all of her hard work :-)


Products:

Garanimals T-Shirt

Heat N Bond (found at Wal-Mart)

Artist Spray Adhesive

Felt

Liquid Applique

Buttons


I cut the image 3 times. Ironed it on. Then sewed on the buttons.

Sunday, October 25, 2009

Boy Treat Paint Can


I used clear paint cans to create a little boy trick or treat can. The spider and spider web can be found on the Wild Card cart. The bat is on the PDDU cart. I tied spider web ribbon around the handle.

Friday, October 23, 2009

Slice meets CB embossing


I recently got the Slice...tonight I was cutting some of the images I think I will be using the most (in all the sizes from 1" to 4" - in 1/2" increments). I bought some CB embossing folders this week from Ms with the 40% discount they were having...here is a 2 1/2" Star from the Slice Basic Shapes cart and one of the CB star embossing folders. I used my SU stampin' spots to ink the raised area and the edges.

Monday, October 19, 2009

Prayer

Please say a prayer for my friend Whitney...she is not feeling well due to infection.

Sunday, October 18, 2009

Pagoda Frames


I used "My Community" Cricut Cart to cut the Chinese Symbols and the Pagoda (both at 6"). The 8x8 black frames are from Ms. The paper is "g c d studios" Designer Paper Item # 602 Patchwork Dots and #063 Peekaboo from the Chianti Collection.