Wednesday, November 21, 2012

My cut file, a romantic boy

I created this boy for fun tonight.  It was a challenge to see what I can do with the Silhouette Studio software.  All shapes were created by me and either grouped or welded together to make this lil guy. I used the fill feature and then shaded, giving even more dimension.

Boy created with basic shapes and altered end points

Here he is with the "cut lines" shown
Hope you like!
 
Happy Thanksgiving!!!

Tuesday, November 20, 2012

I drew my own cut file!

Free handed on tablet.

Opened image in Silhouette Studio, used the trace feature to create my cut file.

Here I did the same thing, except the cut is an outline of the girl.  The green border was just to make the file look pretty, I didn't need it so I cropped it out for this purpose.

After purchasing a few cut files this weekend, I thought to my self, "Self, you might be able to make your own cut files".  After much research, I found a free app that I liked enough to spend some time learning tonight.

I can't draw at all.  Well...I am pretty good at stick figures, haha.  I was happy with how this turned out though.  It was just for fun - and I was happy it worked with the Silhouette software so easily!

My daughter and I created a couple of pictures with this app.  They were not created to be used with the Silhouette, but they turned out nice so I am sharing with you.  So much fun!  My son gets to play with it tomorrow, he was busy tonight.


Sunday, November 18, 2012

Winter Fun Card


Winter Fun!


I made this little card today as an experiment.  I purchased the .png file online and couldn't wait to play!  It took me a minute to figure out how to get the image traced correctly so I could actually cut it with my Silhouette, but I finally figured it out!
 
This is not my first time playing with Non-Silhouette files but it has been a while and I had forgotten how to do this.  I searched youtube and it helped a lot, but I could not for the life of me get the trace feature to recognize the white parts, ice skates, cuffs and snow ball.  A little editing in Photoshop and voila, it worked!
 
I don't have any winter paper, so back to googling again...the polka dot pink paper was also purchased online.  I printed it on my home office printer, then put it in the Silhouette to cut my card.

It's missing a sentiment, I know.  After I made it this far with the card, I took some time to do some projects with the kids.  (This little girl might need some glitter too!)
 
I love this girl, she reminds me of my daughter :-) 

Friday, November 9, 2012

Zebra Bookmark


I don't know why, but I struggle with the new blogger.  This is my third time trying to post - so I am going to keep it short.

Products used:

Create A Critter Cart
Cricut Imagine
Cuttlebug
Sizzix dry embossing folder

I used layers of craft paper to make this bookmark sturdy.

I think it is time for a nap now :-)  Have a great weekend!

Sunday, October 28, 2012

Fall


Happy Fall!  

What a wonderful time of year :-)

I made this fall wall art using a file I got from the Silhouette Store.  It was free a couple of weeks ago.

This was so easy to make - it actually took longer to take the picture than to create and frame this subway style art.

I purchased the frame from Hobby Lobby.  It was originally green, but I wanted it to be white, so I spray painted it.

Have a great fall!!!

Saturday, October 27, 2012

Owl Bookmark


I had so much fun making the bird bookmark yesterday I decided to make my own.  I used an owl cut file I had and I added an "U" using the text feature.  Voila, a bookmark.  In order to make these sturdy enough to last longer than 1 day you need to make multiple layers using the thickest cardstock you can find.  I used my Xyron to apply adhesive to all the layers.  I finished these adorable owls off with some twine.

I made all of these out of the same paper.  I am trying not to leave any unused paper when I cut.  I also cut a card and some birds for another bookmark.  Now I have a card to use in the future and another bird bookmark for my daughter.

Friday, October 26, 2012

Bird Bookmark

Bird Bookmark


I made this bookmark using a file from the Silhouette Library.  In order to make the bookmark stronger, I cut this image 5 times, twice in the pattern card stock and 3 times in craft paper.  My daughter lved it!

Cricut Imagine No Longer in Production

Imagine-Announcement

Well, PC finally announced the Imagine is no longer in production.  What a waste of my money.  I bought mine on QVC.com a few minutes before it launched and I was one of the last to get mine. Remember they sold more than they had on hand.   I had problems updating it from the start..had to send it back after spending days on the phone with customer service and the software manager (and the infamous hang up I used to read about on the message board happened to me).  The second phone call I told the guy he better not hang up on me and he did...but he did call me back and apologized greatly.  There was NOTHING wrong with my machine, so they sent it back to me and all of a sudden I was able to do updates with no problem. 

My husband got tired of all the problems I would have when I scrapped, so he bought me the Silhouette SD.  Scrapping has been so much more enjoyable since then.  I was happy with my small machine but when the Cameo came out, my hubby bought it for me for Christmas.  I gave my SD to my sister. 

I stopped visiting the Cricut MB but for some reason I decided to go take a look.  That is why I saw the announcement.  What a shame, what a total waste of $500.00.  I knew better but the excitement got the best of me and my hubby bought the Imagine for me at launch.  I learned a lot through this experience.  It is very sad to me...the things I read about this company is horrible.

Pumpkin Lanterns

Pumpkin lanterns

These pumpkin lanterns are great for use with a battery operated tealight. The file can be purchased from the Silhouette Store.  I have made 13 so far.  I plan to line my driveway with them on Halloween evening.

Witch Hat

3D Witch hats

These cute little hats were purchased from the Silhouette Store.  They are easy to make.  These are 2 different sizes.  The original file is the smaller one pictured.  Not sure what I am going to do with these, maybe put them on the front porch on Halloween.

Mini cards and envelopes


Cards - Click picture to enlarge


Card with overlay and twine
Envelope
I needed an envelope for the card I made the other day and I found this one in my Silhouette library.  Once I made the cute little envelope I was ready to make some cute cards and envelopes.  Not realizing it, I chose the matching card to this envelope.

The paper is Hoot Hoot by the Paper Studio.  I purchased it at Hobby Lobby.

On some of these I cut out the card and then an overlay.  For the others, I just cut the card and added twine or ribbon.

Later, I can add a small label on the front to add the perfect sentiment, ie Thank you, Happy Birthday...


Hope you like!  Have a great weekend.

Friday, October 19, 2012

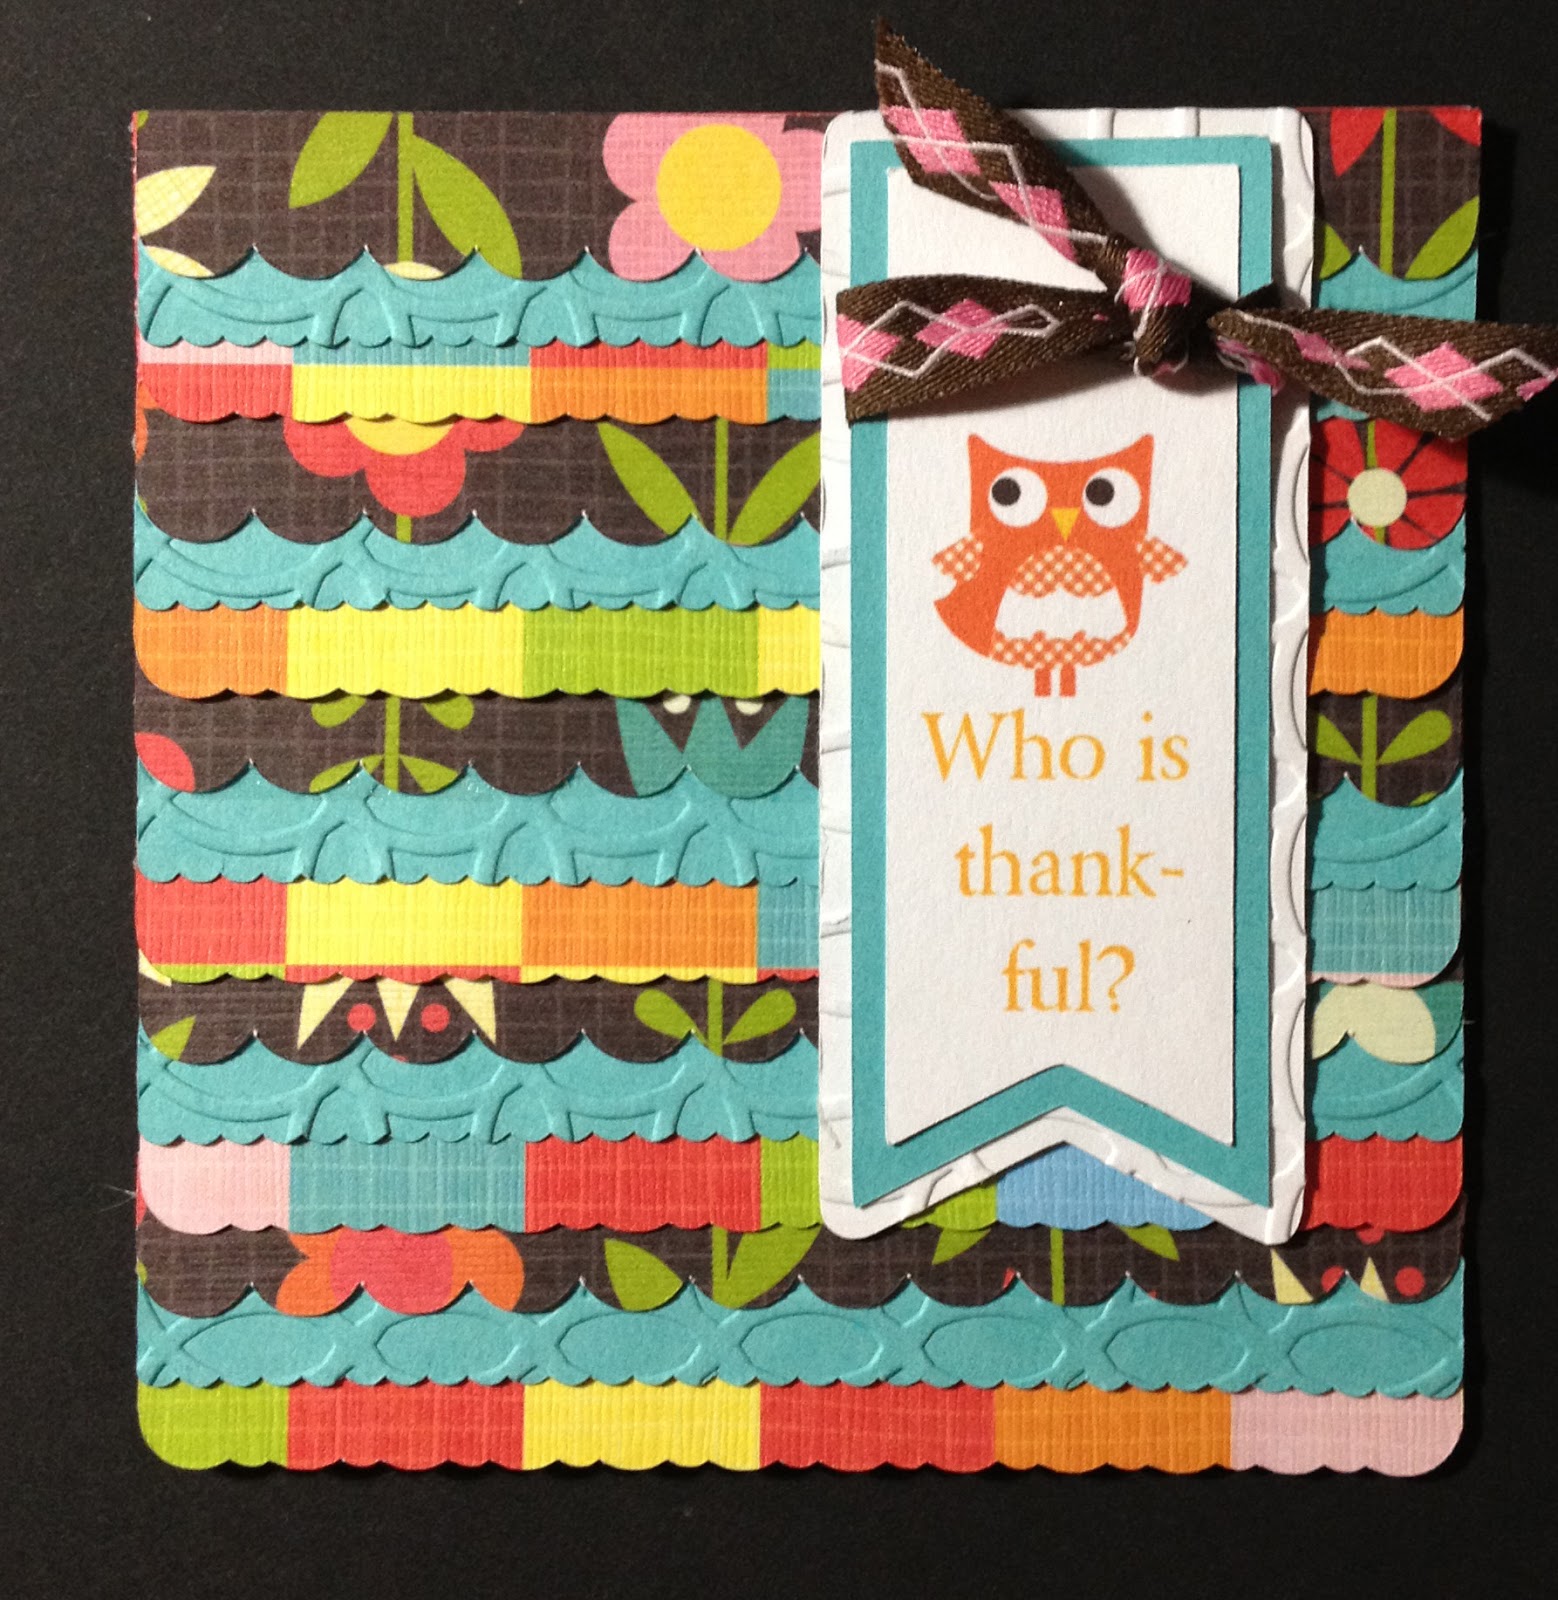
Who is Thankful?


Cut card
Cut borders

Tape/Glue border pieces together

Adhere borders to card


Assembled card
Matching envelope and the back of the card


This was a free Silhouette shape a few weeks ago.  I didn't want the pumpkin on the original card, so I used the print to cut feature and added the owl and text.  I also used the offset feature and the internal offset on pennant.  No project is complete without dry embossing :-)

Saturday, October 6, 2012

All Geared up for Your Birthday!

Robot Card

3D view


Back of card and embossed envelop flap


 I created this card for a birthday party today.  The orange gear pattern is an overlay pattern I bought from the silhouette store.  I used spary adhesive to attach it to the blue card.  It wraps around the card so the front and back both have the orange gears on it.  

The robot was also purchased from the Silhouette store and since I was short on time, I just filled in all the layers with the colors I wanted and printed him on my printer, then I had my Silhouette cut him out.  (LOVE this feature!)

I free handed the envelope and dry embossed it with the Cuttlebug "Clockworks" embossing folder. 

I wanted the robot to stand out from the card, so I doubled up on the foam 3D.

The white gear was an extra purchase from the shilhouette store, it came with a few other gears.

Sunday, September 9, 2012

Anniversary!!!


Couldn't let today pass without giving a shout out to my wonderful hubby! We just celebrated our 17th anniversary this weekend. We went to the mountains in GA and ziplined...yep, I conquered my fear of heights and flew threw the air 12 times. There were also multiple sky bridges with missing planks (on purpose) and even a tight rope (couldn't believe it!!!). We survived and had an awesome time!!! Here's to another 17+ with my great man!!!

Sunday, September 2, 2012

Birthday card


I made this card using a template I purchased from the Silhouette library. Instead of using the flower they provided, I used the 3D magnolia. I dry embossed the blue layer to add texture. One of my favorite things about my Silhouette is that I can print on my home computer and cut with my Silhouette. It's so easy to use and works out great since I am not great at stamping. Hope you enjoy this sweet simple card.

Friday, August 31, 2012

Birthday Gift Card Holder


I made this gift card holder for sweet twins turning 2. Most kids have "too" many toys, so I thought it would be nice if they got a gift card instead. Who doesn't love ice cream (besides me?)!
This file was purchased from the Silhouette Library. I used my Cuttlebug to dry emboss all the pieces. Once the pieces were cut, I inked them with coordinating SU! ink pads.
It's been a while since I posted, hope you like this!

Sunday, June 10, 2012

Updated Scrap Desk

My updated scrap space...


 and how it looked before...


Worked hard this weekend on painting this room, too tired to fill my "hutch"...reorganization in progress!

Leave a comment and let me know what you think, esp if you like the pic my husband took of the updated space, he would love to hear the feedback on his photography skills.  He was so much help this weekend.  There is no way I could have gotten as far as I did without his help.  He's a keeper!  Thanks for helping honey!!!  :-)

Sunday, June 3, 2012

Flower Pot Card for Professional Admin Day


Professional Administrative Day was in April and this is a gift card I made for our Office Administrator (OA).  I purchased all the images from the Silhouette store and used pattern paper to pull it all together.  I like to decorate the front and back of these cards. 

Project Life - Space Week


I made this card for my Project Life album.  When  the kids are in  kindergarten they have week long units.  One unit is always Space.  I bought all the images from the Silhouette Store, including the Fabulous background.  (Please excuse the paw print as it hides the school acronym.)  I printed it as is and cut the edge. 

Saturday, June 2, 2012

Project Life cards


Here are 2 journal cards I made using my Silhouette and pattern paper bought from the Silhouette Store.

To add the fall border on the top of the first one, I made a rectangle longer than the image I was cutting and set the option to no cut...that way, I didn't have to glue it on the card.  (See below for the cut line screen capture.)


Project Life


I was excited to find this soccer paper in the Silhouette Library.  Score!!!

I have started a couple of albums for my kids with the Beck Higgins Project Life idea.  The journal cards are currently out of stock at Amazon right now because she is changing vendors.  They will now be made here in the USA!  I have been making my own using Silhouette Files.

To make this journal card, I selected the image, filled it with the soccer pattern, then I did an internal offset and filled it with white.  Next, I added my text and chose a font and font color.  Lastly, I used the cut edge option so there were no layers to be glued.  Please feel free to contact me if you need help with this.  If you are doing Project Life, I would love to see your projects, please share!


Thursday, May 31, 2012

Teacher End of Year Cards


Folder and matching gift card holder. 


These end of year folders served the purpose of a card.

I made all the kids an insert page which matched the front of the folder.  To make the insert page I used the knife/cut feature in the Silhouette software to cut off the folder at the bend.  Then I enlarged the image that was left so it would fill the gap between the front of the folder and the back.  As you can see, the front of the folder is much shorter than the back.  The folder files were purchased from the Silhouette Library.  I love these files...one bit of advice is to use double sided scrapbook paper.

Here is the link to the file in the Silhouette Store  - FOLDERS

These were a big hit with the teachers, my son's teacher couldn't even look at hers until after school was over.  They are a great group of kids, so sweet and innocent...I hate to see them grow up :-)

You can see some of the art work, the monkey is the class theme for my daughter's kindergarten class.  The pizza is there because they were studying pizza - I don't know all the details but I know they discussed how everyone likes different things on their pizza and they even made a pizza at school. My kids were so blessed with awesome teachers!

Monday, May 28, 2012

Cherissez chaque moment


I love the new white frames that are the craze right now.  I used the Hoot Hoot paper stack by the Paper Studio and added the phrase, Cherissez chaque moment, Cherish the Moment.  I used vinyl for this project.  I love working with vinyl, it is so easy and the results are always FAB!

Art notebook

 Front cover


 Inside front cover (with pocket)


 Inside back cover (with pocket)


 Back cover

I made this notebook using a cereal box and Hoot Hoot paper pack made by the Paper Studio.

The pocket folders were hand cut.  The trees and owl on the inside pockets were scraps - yay!!!

I used vinyl for the words and flowers on the front cover.

Inside this notebook is probably 50 to 100 white pieces of 8 1/2 x 11 paper.

My daughter is going to spend a few days each week with my parents and I found a really cool book that teaches how to draw animals.  She loves to draw and wants to be an artist when she grows up so I thought this notebook would be a perfect place for her to keep all her summer art.

My wonderful hubby used the Bind it All with Cinch brand wire to put it together.  I love that he does this for me, I am always scared I will mess it up.

Tuesday, May 22, 2012

Thank you card

I made this simple thank you card for my son to give to his teacher because she came to support him at his soccer game.  The card is a Silhouette tab file.  I used the offset feature to make the white portion of the card.  A SwissDots border embossing folder, I assume that is what it is called, was used on the bottom near the zigzag edge..  I also used a "thank you" embossing folder to emboss the rest of the white area.

I love the simplicity of this card...his message was as simple as the card.

I have so many projects to share with you, but so little time...one day, I will catch up with posting some of them.

Have a great rest of the week!

Thursday, May 10, 2012

End of the year teacher gift!!!

I'm so excited!!!  With the help of the other Moms, I was able to purchase a Silhouette Cameo for my daughter's teacher.  Now, I just hope I can wait until the end of the year party to give it to her!