Thursday, April 21, 2011

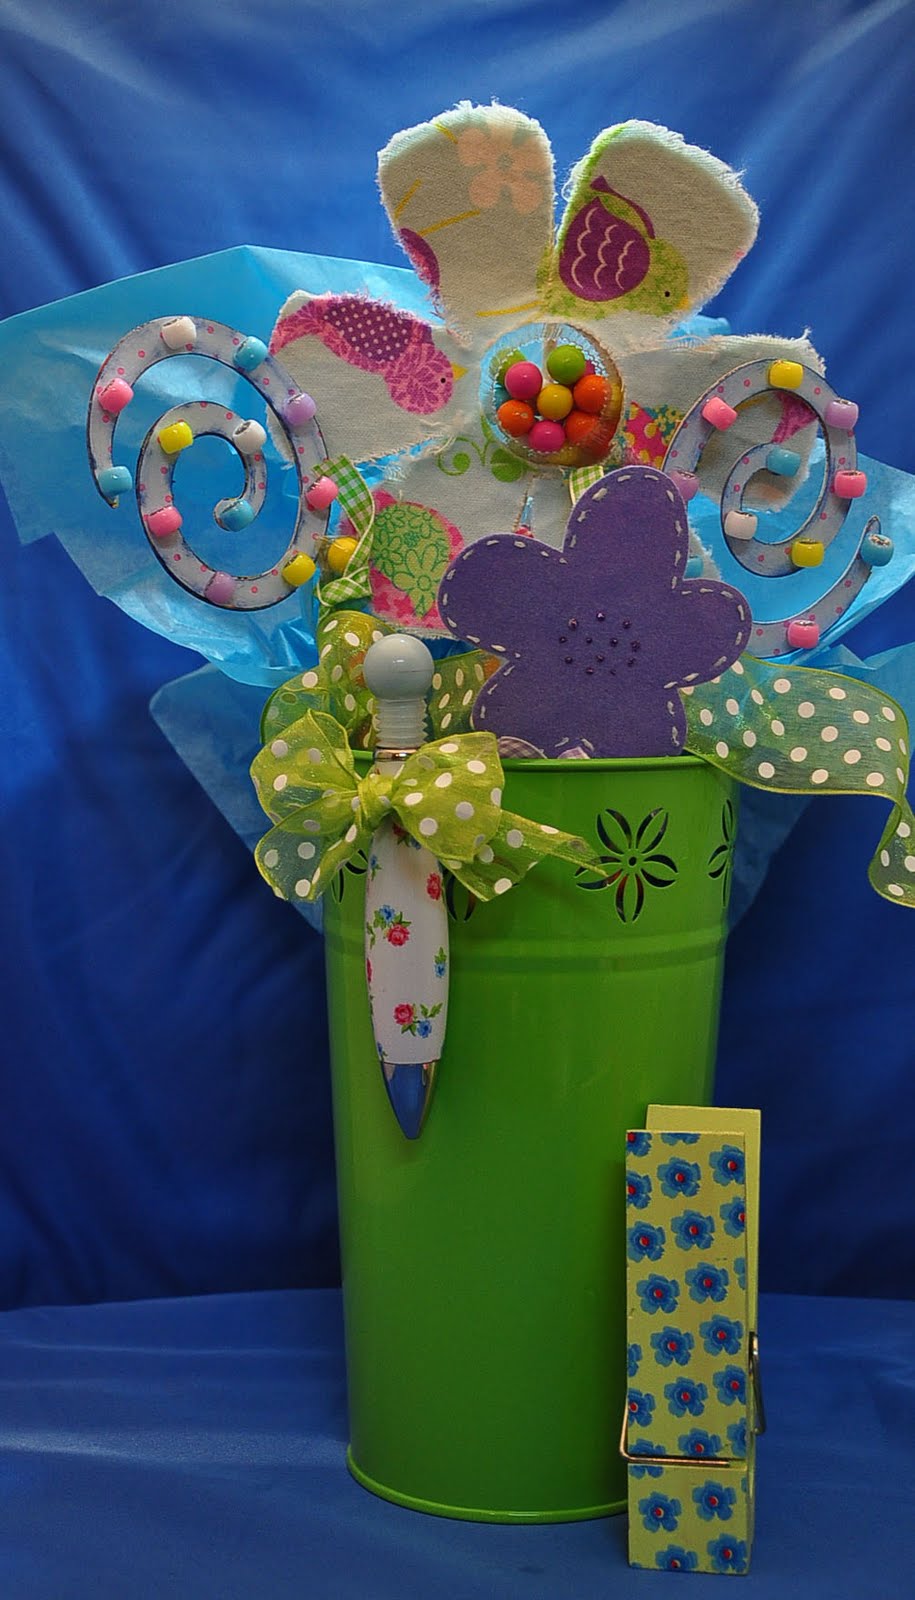
Day 2 - Flower with candy center


(updated with ribbon around the center of the flower)


While I was at work this morning, the thought of swirls with beads to match the candy popped in my head. I was able to leave work a tad bit early and thank goodness my daughter was awake when I picked her up from preschool...we rushed to Michaels as I explained to her how we had to quickly shop so we could make it to school to pick up my son on time. She did GREAT and we made it to pick up my son on time!!!

So, when I should have been working tonight, I was playing with my Expression, beads and flock. I cut the swirls at 3 1/2" (I used left over food packaging [boxes] to make the swirl stronger). Then, I inked the edges. Next, I glued the swirl to a dowel, then I embellished! I added Stickles to the middle of the beads to hide the hole.

I am still not finished with this project - I forgot to buy some ribbon. ;-( Another shopping trip to add to the list for this busy weekend!

Wednesday, April 20, 2011

Flower with candy center


(Click picture to enlarge)


(Click pic to enlarge)

This is an unfinished project but I wanted to show you my idea from last night. I cut the flower using my Gypsy and Expression, yes I pulled my Expression out and used it again, finally!

To cut the fabric, I ironed Heat N Bond (HNB) to the back then I placed the HNB directly on my sticky mat. I cut it probably 6-8 times but this fabric is so thick it wouldn't quite cut all the way through so I used a cutting knife to free the flower from the fabric. I frayed the edges a bit more with my fingernails.

For the center of the flower, I used a 1.99 candy mold from Hobby Lobby and cut one mold out in a circle shape. For stability I cut a flower from cardstock and taped that to the back of the fabric flower. Next, I put the mold in the center of the flower and then added candy. I cut a circle from a clear plastic bag so it can be easily opened from the back.

Last, I taped the little bags of candy to the stem of the flower which is a wooden dowel.

This is an unfinished project, I want to make more flowers. I want to add some vinyl (maybe) and a bow to the vase.

I am making this for our Office Administrator for Professional Admin Day next week so please provide constructive feedback. She likes my creations and appreciates them- otherwise I wouldn't make this for her. I am lucky to work with a lot of supportive men and women, even though none of them scrapbook.

Tuesday, April 19, 2011

Projct in work...Sixlets and Fabric


(Click picture to enlarge)

My next project will hopefully include what you see in the above picture. The bird pattern is fabric. I have ironed on Heat N Bond to the back. I am not sure how this project is going to turn out...I was going to try to add a bubble to to the inside of a flower using the pretty candy (unwrapped of course) but now I kinda have a different vision. We will have to see how this turns out. Whatever happens, I think the candy will be a part of this project, even if the fabric gets replaced with paper or a different fabric.

Tuesday, April 12, 2011

Where is Audrey Frelix?

I haven't seen Audrey post in a while, where is she???

Sunday, April 10, 2011

Sympathy Card


Envelope


Envelope and card


Inside card


I made this sympathy card for a co-worker. His mom passed away last week. I used my printer and Silhouette to create this card. I embossed the scalloped frames behind his name on the envelope and I also embossed the back top part of the envelope. On the front of the card, I printed the sentiment on cardstock, then ran it through my Silhouette to cut out the shape I wanted. I added more space for our team to write a message on the inside upper part of the card. I cut the envelope out by hand. Something new I taught myself tonight. No template, just fold and cut. :-)


Saturday, April 9, 2011

Quilting Template turned in to Silhouette Mat


This is the plastic quilting template I bought.


I cut it down to size and put painters tape on each side.


Next, I sprayed with Easy Tac Repositionable adhesive, let dry then put my paper in the appropriate place so I could cut.


Here is the result...worked like magic!!!!

Friday, April 8, 2011

Bunny Treat Bag

I purchased this template from the Silhouette online store. I thought they would be cute for my kids to hand out at school. The face is a scallop, the mouth looks like 2 circles welded together. I used flock on the ears and nose. On the bunny's face and ears, I did a little dry embossing with my Cuttlebug.

Owl Slider Card

Supplies: Silhouette Silhouette Studio Software Cricut Cricut cart Fab. Finds Ribbon Cardstock Ink Cuttlebug Embossing folder Adhesive (of course) I found this envelope for a slider card in my stack of scraps...so I decided to use it tonight! I hand cut the card with my straight edge, used a corner rounder to round the edges, then I inked the edges. I created this odd little owl using the Silhouette Studio Software. I just used basic shapes to make her, welded everything together, then cut her out with pattern paper. I decided she needed a shadow, so I created the shadow with the same software, cut it out on colored cardstock, then dry embossed with my Cuttlebug. I used Copic markers to fill in the black part of the eyes and the brown nose. I think the original envelop is from the Cricut cart Fab. Finds.

Thursday, April 7, 2011

Hello!!!! I can't post...no internet :)

hello! I have a post today but our internet is down and probably will be down for a while...bummer!

I will see you guys when I get back online, hopefully that will be Monday.

I miss you guys!!!!!!!!

Monday, April 4, 2011

New Slice Cart

Lion from Slice Zoo-Topia (first cut from this cart!)


Rabbit, also from Zoo-Topia I used my Copic Markers to fill in the pink areas, then I inked the edges. No project of mine is complete without a little embossing, wink wink!


Over the weekend, I pulled my much neglected Slice out of my closet. Found out, I kinda like my Slice more than I orginally thought. Yay!!! Last night I checked out Hobby Lobby's (HL) ad and found out the Slice stuff is on sale this week. 40% off! waahhhhoooo!!!! I overslept this morning (2nd time in the last 2 weeks) - finally made it to work about 8:30, I usually get there about 7am. An older gentleman in my group started a rumor that I am pregnant, my boss thought that as so funny so he came over to tell me when I got to work. Lucky me...my boss is so understanding. It helps that I am a very dependable employee. :-)


I was dying to go to HL to check out the Slice carts...so I did and I found the Zoo-Topia cart which reminds me of the Cricut Create a Critter cart. I got back to work only to find out about an hour later - school was closing due to possible bad weather. Ahhhh, seriously! My boss can be hard to find sometimes, he is very busy...so I sent him an email and he responded by saying "Sure, making up for coming in late". I had to go into his office before I left and he was laughing about my day...did I mention what a great boss I have???


I should have been working tonight to make up for my lost time, but this cart kept calling my name!


While I was HL, I found a new embossing folder by Quickutz - it is called geometric circles. I am excited to use this new embossing folder!!!


...and no, I am not pregnant! my husband didn't think that was a funny rumor...heehee

Sunday, April 3, 2011

Butterfly card

front of card


inside card


back of card


I made this card using my Slice machine and the Basic Shapes 2 cart. Butterflies are cut at 2", except the little one is 1 1/2".


I love this double sided paper. It is part of the K&Company Swet Nectar die-cut cardmaking pad. I dry embossed the pink paper on the front of the card and also embossed the pattern paper on the inside of the card.


The Scrapcrazy ribbon was given to me by my husband. He had is special made for me as a surprise (a year or so ago).

BFB Award!

Thank you Tanya for the Best Friend Blogger Award!!! I am so glad we are friends!!!!! I look forward to your posts every day. Bloggers, please visit Tanya at http://nonnascraftcorner.blogspot.com/ and make sure you follow her. You will ♥ her cards and layouts. She always inspires me and even tempts me to get new carts when I see her projects.
Rules:

1. Post about the award on your blog with a link to the sender.

2. Pass it on to those who visit your blog and leave comments regularly.


I am passing this on to Stacy at http://lovethatbug.blogspot.com/. Stacy is currently making cards with all the critters on the Cricut Create a Critter cart. Be sure you check out her blog and follow her. Everyone is really enjoying her CAC series. I wonder what she will do next? Follow her and find out!


I would pass this on to Audrey also, but she has received this award. Make sure you visit Audrey at http://cuteandsome.blogspot.com/. You never know what Audrey is up to...she is so creative and is always doing something new and exciting. Follow her to see all the awesome ideas she comes up with daily!


Thanks again Tanya!!!! Hugs!

Saturday, April 2, 2011

Robot Bookmark


Cuttlebug Clockworks dry embossing and Slice Tag Maker cart, cut at Large size.

I used my Slice to cut out this tag. I dry embossed it with Cuttlebugs Clockworks folder, isn't it awesome??? I used the Recollections Robots clear stamp set for the robot. The blue paper is scrap paper left over from the Cricut online class I "took".


This is very simple I know, but I ran out of time tonight. My son will love it no matter what. One good thing about my kids, they love everything I make and cherish it.


Have a good weekend everyone!

Spring Tag/Bookmark

(Click Image to Enlarge)


Today, I decided to use some much neglected tools. I broke out the Slice and Bind it All while my kids were playing with the Cuttle Kids.

To cut the dragonfly and butterfly, I used the Slice Basics 2 cart. I think the dragonfly is cut at 3" and the butterfly is 2". The tag is from the K&Company Sweet Nectar Tag Pad that Tanya sent me :-) (Thanks again, I ♥ it!) The jewels are by Recollections and are also from Tanya. I used the Bind it All as a punch on the top, didn't turn out great but it is OK for my purposes. "Spring" is a stamp (from Tanya, isn't she awesome!) Check her out http://nonnascraftcorner.blogspot.com/


I was just playing - not really making this for anything but thought I may put it on a card. Before my daughter went to bed she said she wished I would give it to her...how can I say No??? So, now I have to go make something for my son...he loves for me to make things for him too.


Thanks for looking and leave a comment if you like!

I cleaned!

I cleaned off my desk today. Thought I would share my scrap area with you. I bought the white rolling cart after Christmas. I wish it were black but it doesn't come in black. I really like it. It holds ribbon on the side (2 rows), the top is open with cubes on the inside for punches and stuff. It came with cheap white baskets but I found these fun polka dot ones at Target, they fit perfectly!!!! I bought my desk from Pottery Barn and my husband has a matching one in this same room (but he has a different hutch). I have all my carts in a black chest I found at Hobby Lobby (not shown). My husband installed lights under the hutch, they help out a lot. He also put up 2 strips of metal so I can hang stuff as needed. The old cameras on top of my hutch were my Mom and Dads. They didn't want them any more so I took them. We would love to turn this room into an artsy kind of room. But right now, my husband decorated it with a Safari theme. We spend more time in our study than any other room in our house. Thanks for looking!

Tuesday, March 29, 2011

Baby card

Notice there is no picture...I would have had a post for you tonight but my Imagine is NOT working properly. I think it has something to do with an old cart. I am trying to make a card using Wild Card. I have not updated my Imagine with the latest version - frankly it scares me to death. I put Wild Card cart in my Imagine, select my image, size it, then try to cut it...it runs through the "print" but doesn't pull the mat back through so it can even try to cut. I made sure there is no Imagine cart in the machine but that doesn't seem to matter. I tried a brand new mat, which by the way IS NOT STICKY...yeah I am frustrated tonight, sorry guys...I'll move my "Complaint Free World" braclet to the other arm now...

Sunday, March 27, 2011

Things that make you go hmmm...

Original design Take 2...Take 3... I have crafters block today!


I found this cool paper pad and pen at Michael's today. They are super cute but I just couldn't come up with anything to do with them. I loved the idea of using the frame...one I have never used and don't remember seeing anyone use. It is from Stretch Your Imagination Cart. I think my problem is I want this to be "grown up" and I don't know how to do "grown up". I'm going to keep thinking on this...TO BE CONTINUED!

Versatile Bloger Award


Good morning!!! I received a blog award from Stacy at http://lovethatbug.blogspot.com/ Thank you Stacy!!!! Sorry it has taken me so long to respond...I've had a bug this week - and not the green little bug we all .


The rules to accept this award are...


1. Thank the person who sent you the award

2. List 7 things about yourself

3. Send this to 15 bloggers


About me:


1. I grew up on a farm in Alabama

2. At a young age I decided to go against the grain and become an Auburn fan (and my dad still paid for me to go to college! Thanks Dad!!!)

3. I married my husband while I was still in college

4. We moved back to our hometown after we graduated (we graduated together)

5. I have been working for the same company for 10 years

6. We were married for almost 8 years before we had our first baby (by choice)

7. I try to call my mom AT LEAST every other day (it makes her happy)


Now...to pass this on to 15 people!


8. http://amandascraftsandmore.blogspot.com/

9. http://dtsartblog.blogspot.com/

10. http://happylifecraftywife.typepad.com/blog/2011/03/a-project-so-easy-a-caveman-can-do-it.html I'll be back to post more...gotta get ready for church! Thanks again Stacy for thinking of me!!!!

Chick


Last year I found this tin at CVS but forgot to use it for Easter. I created this for my son and was going to fill it with candy but I am not a huge fan of candy so I have another crafty idea for the inside...you will have to wait and see what that will be ;-)
I cut the egg from Stretch Your Imagination cart at 7". Then I dry embossed it with Cuttlebug border embossing folders. It turned out really cute and I almost didn't want to cover it.
The 2" chick was cut from Create A Critter, I used Glue Dots pop up to add dimension between the layers. Since I cut this with my Imagine, I chose the yellow I wanted the chick to be and had the Imagine print the color yellow on the chicks top layer, then cut it. For the bottom layer, I chose to only cut it using white paper, I used my Copic markers to fill in the eyes, legs and feet with black. I used my yellow Copic marker to fill in the rest. The yellows match - no one would know how I did this just by looking at it. Chick looked very plain so I decided to dry emboss him. I also added some flock to his tummy.
Added a ribbon and bow, Voila, done! Now I have to make one for my daughter!

Thursday, March 17, 2011

Thank you Tanya!!!!!!!!!!

I took the day off today - well mostly, I had to go in at 7 for a meeting with my boss and his boss. We are trying to make sure we have enough budget for all the employees in our group. 130 employees will be recieving layoff notices tomorrow at our site. Please keep all those people in your thoughts and prayers. After my meeting, I had a routine dentist appointment - then I went to see my parents (who were keeping my kids). It was nap time by the time we got home and I admit, I fell asleep for a couple of hours. We finally made it outside for some play time, when I decided it would be a good idea to clean up some of the pine needles on the sidewalk. When I made it to the front door I noticed a package and thought...I haven't ordered anything, must be for my husband but NOOOO IT WAS FOR ME!!!!!!!!!!

Tanya from http://nonnascraftcorner.blogspot.com/ sent me a box of goodies! I am so excited to play with these beautiful papers, tags, stamps and gems! She even made me the cutest card! I love this frog and the pattern on the frog and the background paper. This is one of my favorite Imagine images/patterns. This is the first long distance RAK I have ever received! Thank you Tanya, you brought tears to my eyes when I opened your card!!!!!

Tanya is also an Auburn fan which makes me like her even more (haha!!!) If you are not following her blog, you should!!! She is an amazing scrapper (and she has an amazing set up). I hear she is going to be a "Nonna" again, so hop over to her blog and congratulate her!

I'm off to play with my goodies, thank you Tanya for making my day - I'm so glad I found your blog and have you as a friend now! War Eagle Nonna!!!!!!!!!!!

Wednesday, March 9, 2011

Anyone watching American Idol?

Just wondering if anyone is watching American Idol. If so, who are you pulling for and why?

I have to say the top 10 is really talented. The 3 wild cards...I liked 1 of them, Stefano. My favorite has been Paul McDonald. Turns out Paul is from my hometown and went to the same college I attended (War Eagle!!!). I didn't know this when I started pulling for him, seriously!!!

I really like Casey, Karen, Thia and Pia also. Jacob is awesome - he is so talented, but I am not sure I would like a CD of his??? The country guy cracks me up, but he did a good job with Garth tonight. I was dreading his performance but it turned out better than I expected.

What are your thoughts regarding American Idol, do you like it, hate it or don't care???

Sunday, March 6, 2011

CD holder


I made this using Fabulour Finds, George and Gypsy font. The cd envelop is from FF, the keys are made from George and the font is Gypsy font. I made this for my Mom. Her birthday is today and she wanted a copy of a disc from my brother's church. I added the keyboard because my brother played the piano there. CDA were his initials.

Friday, March 4, 2011

Mom's Birthday card


I used the branches, flowers and leaves from the Cricut online class - altered them to fit this card. The bird is from the Storybook cart. Sentiment was printed on our home computer. Added stickles to the flowers and 3D to make them pop. Dry embossed the cockatiel.

Wednesday, March 2, 2011

Live on Toomer's Corner!!!

Toomer's corner Oak Tree - poisoned and unlikely to survive.

Auburn wins a game, the tradition is everyone heads down to Toomer's Corner where the old Oak tree gets rolled. Toomer's Drug store on the corner sells the best Lemon Ade!

I hardly ever get a scrappy idea in my head but the other day, this popped in my head and I just had to do something. There are many ways I could have scrapped this...but for today, I chose to have a live tree with paper on it - to remember all the good times my husband and I had there together, celebrating victories.


I used Plantin Schoolbook and My Community for this project. The AU border is a 12x12 piece of paper cut just to show 1row of the AU. I still need to cut "Toomer's" and "2011" but I wanted you to see what my idea is...I added these with Photoshop. Sorry not enough time in the day - hubby had to work late, my son had a report to do about George Washington and I had to work a little after I picked the kids up from school.
You can't tell, but the navy paper in the background is dry embossed with what looks like "Swiss Dots" but I bought it from my LSS and I don't know who made it.
I hope you like, I have new ideas for another tree project, but it is not as pretty :-(

Sneak Peek at my next project

Here is a sneak peek at my next project. I hope I find time to complete it soon!


Sunday, February 27, 2011

Hello card

I made this card using photo paper and my Imagine. The tree is from Stretch your Imagination and is cut at 4". The grass is from Plantin Schoolbook and is cut at various sizes, no larger than 1.5". Th girl is from the Best Friends Imagine cart and is 2.5". The sun is left over paper from the Cricut Online Class and I used my circle punch to it into this shape. I made the pink flowers with ribbon. The blue flower was bought at JoAnn's today. The balls on the tree are from ribbon, I just cut them off. The bird in the tree is from Winter Woodland. All the items cut are printed on photo paper and colored using the Imagine.

I feel like there is something missing...maybe it is dry embossing, or inking, or maybe a sentiment. Hopefully I will figure it out soon. I want to get this in the mail this week.

Thanks for looking!!!

Cricut Online Class


I took the Cricut Online Class. Due to technical difficulties I was pretty much unable to view the video...got tired of waiting for PC to send out a link to the video, so I decided to do this on my own by looking at the pic provided for the class. I am NOT a painter, I couldn't figure out how she painted her canvas...but I went in to this project thinking I can redo it if I want. It's ok, but there are things I would change if I decided to do this project again. If I were able to watch the video real time, or had the video link to watch it within a few days I would have LOVED the online class. Right now I am not sure I will do another online class with them.

Wednesday, February 16, 2011

It's a sad day...

http://sports.espn.go.com/ncaa/news/story?id=6129272

Our tradition has been tainted.

I don't normally post off topic, but this really upset me. We will still meet at Toomer's Corner.

War Eagle!!!!

Tuesday, February 15, 2011

Liebster Blog Award


Audrey awarded me the Liebster Blog Award, isn't she a sweetheart??? Thank you Audrey!!!!!


The Liebster Award is given to people with talent you admire but feel they do not get the recognizition they deserve.


I'm off to find 3 blogs to pass this award to now. Audrey, thanks for thinking of me!
Here they are (in no particular order). Please check out these talented ladies and follow their blogs.

Sunday, February 13, 2011

Kiddie Valentines


I secretly made these for my kids today.
The tiger box was made using Tags Bags Boxes and More and the Create a Critter carts. The red heart is from the Sweethearts cart. It is dry embossed and ink embossed. I used Copic markers to make his stripes.
The poodle bag was made with Once Upon a Princess cart and Create A Critter cart. I dry embossed the bag, how beautiful is this embossing folder??? I flocked the darker pink areas of the poodle. I bought the ribbon from Hancock, had to cut 1/2 off the bottom so it is not going to be pretty for very long. Stickles for the toes (gotta fix this, my hubby messed it up when we were deciding where to put the second eye. The hearts are foam someone gave us. I used ribbon instead of the bows on the poodle ears. Since I had to add ribbon to this bag, I made the poodle 3D. Brads were used for the eyes. This poodle is kinda awkard...it only had 1 eye in the handbook bc of the angle. I think my daughter will love it anyway...she's so supportive!


Inside I put a couple of packs of gummies. My kids have been asking for pillow pets...so I finally bought each one and gave them to the kids tonight so they could enjoy them before going to bed tonight and school tomorrow.
Jin from Under a Cherry Tree was my inspiration for these bags. I don't have Make the Cut or I would have used the files she used.

Sunday, February 6, 2011

Hello Kitty Birthday

Hello Kitty decoration

Birthday girl's cupcake

Brother's cupcake


Mom and Dad's cupcakes

Today, my daughter turned 5! I made the Hello Kitty and hung it from the kitchen light with some streamers. I also used the Hello Kitty cart to make her cupcake decoration.
I used Create a Critter to make the dinoasur cupcake decoration for my son. He colored his own frosting to match the green paper. She was napping when I made cupcakes so she didn't get to play with the food coloring and frosting.
They love it when I make something for them. My daughter always tells me at random times that everything I make is beautiful. They are so sweet!
She is having a My Little Pony cake tomorrow at preschool.
I didn't get to decorate as much as I wanted, but I am happy I was able to do a little to make her day special. She very much appreciated it.